Sunday, July 13, 2014

MAKING COPIES FOR COLLAGE


Atargatis, a Mature Goddess Figure Connected with The Sea. B & W Copies on Rice Paper,  Chine Colle. © by R. Zachary

Copies for Collage

This piece, created in the late 1980s, was planned to be run as a limited edition, and was adhered to Stonehenge Printmaking Paper using a press, in a process known as chine colle. Flour based paste was used to bond the wet papers as one. Artists were just beginning to try new technology, and I had a new Canon Copier. 


Chine Colle is a process very similar to Collage, and I am showing it on this blog in connection with this Collage Series, to remind people that it is still possible to extend the use of limited imagery by making copies, either with a copy machine, or with a computer. Note the ability to repeat images by making multiple copies, and how repetition creates movement and carries the eye as a compositional device. 
Once the copies were made on acid free rice paper, I cut the pieces out and they were arranged into the composition. Then the image was adhered to rag paper in the press, using the chine colle method.  Because images are brought together and adhered to one surface, it is both a collage and a montage
While you are at it, you might as well make the copies on good paper. I recommend using rice papers, mulberry paper, and for ink jet prints, Epson lightweight matte paper. Epson inks are more colorfast than many other printing inks. These papers retain images well when used with acrylic medium and varnish.
Some copy images are adhered to paper by wax emulsion and heat. This type of image will not run when wet.
Some rice papers will cause pigments to run because these are not treated to keep the inks in place on wet paper. Again an accident can be a bonus - I sometimes use this quality to create watercolor effects on collage papers. One way to slow down this runny characteristic is to spray the image lightly with spray varnish or lacquer. Let it dry in the open air before using it in collage.
Experiment first, by taking a small sample and adhering it to mat board. Prints on Epson papers don't move, but tend to turn more intense and dark, so the original used needs to be somewhat lighter in value to have the desired result in the collage. 

 The Scanner or Copy Machine Used as Camera:
Below is another limited edition print I made using the copier as a camera, I made copies of my printmaking apron, my  crocheted homemaker's apron, pictures of my lady shoes, and of my print maker's boots which I wore in my studio. 

I was torn between being a wife, mother, and artist, and wanted in some ways to cut the apron strings. The mother bird with the brood was symbolic of needing to care for family needs first. Although I love abstraction, I also love realistic imagery because of things I want to say, when images are used as metaphors. Note: This image was used previously on 2-28-2014 on this blog. The brown tones were a feature of the Canon Copier.
Apron Strings, 14x17". Chine Colle.  Using Copier as a Camera                                        © by Ruth Zachary


All Images and Writing are the Copyright  © of Ruth Zachary and are not to be reproduced without written permission from the Artist/ Author.

Sunday, July 6, 2014

EXPERIMENTS AND ACCIDENTS

Watermark Design with black background.  Unfinished. © by Ruth Zachary
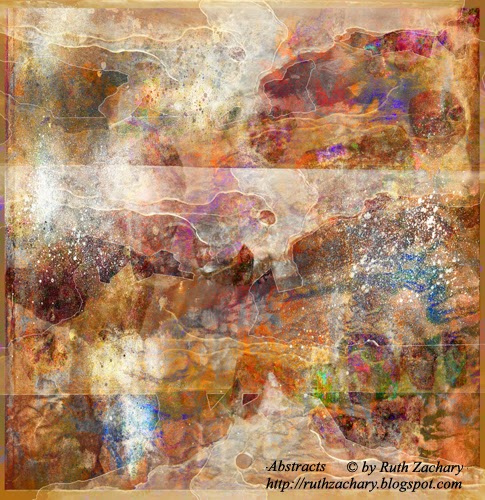
This image began as a water stain on a plant table. I took a photo of the watermark. The point of this post is to demonstrate how keeping aware of accidental imagery can result in wonderful papers for collage. The camera can be used to capture frost on windows, reflections in water, close-ups of graffiti, and numerous other textures.

I also explained on my Abstract Art blog today that I had forgotten to save the design with a transparent background, and that I would explain how to "remedy" that, later. Actually I am explaining it here.

In Photoshop, the pure white areas of the arrangement were selected, under the Select Menu, where an option allows selection by color. White was selected, and then I filled the selected areas with black. As you can see at the edges of the black, tiny bits of the white can still be seen. This is the remainder of the white areas that were there before.

If the transparent areas had been preserved, these white lines would not have been retained. It was not a perfect fix, but on the other hand,  in some of the layered experiments that followed it, the tiny white edges impacted the other imagery as different modes were applied to the layers.


Watermark Design Layered with Other Textured Image Layers in Photoshop. Unfinished.

Although both examples are a more abstract kinds of images, the  shapes suggest landscape and rock formations. I might choose to finish this, after making some adjustments to what started as a series of accidents. Or the design could become sections for use in a collage of either abstract or realistic art. Any resemblance to real images, people or animals in the above sample are purely accidental.

See my Mixed Media Abstract Art blog for an emphasis aimed at abstraction.

Image and Writing are the Copyright © of Ruth Zachary.


Monday, June 30, 2014

BASIC COLLAGE METHODS AND TECHNIQUES


 More How-To Steps for Collage

Coat both sides of the foundation background with Acrylic varnish or Gesso.
           
Plan for a mat, or space around the image or for less detailed border areas at the edges (2to 4”)  Cut edges of images or paper with scissors, Exacto Knife, decorative scissors, or tear the edges.

Arrange the pieces of paper where they look good to you over the ground. Adhere the main composition or collage. When you have your main layout planned, then begin from the edges (leaving a border area if you want one.) Glue toward the center, leaving gaps or overlapping pieces, according to your preference. Some people start at the center and work out, or lay down a few pieces at a time working out the composition as a whole while in progress.


My Past Life, a Long De Nile, Scan of Layout in Progress. © by Ruth Zachary

Acrylic medium or varnish is excellent for adhering materials to the ground. Elmer’s glue can also be used to adhere images to the ground. Dilute a small quantity of glue or medium with water- as much as 25% to 50%. You will learn which works best for you, or for different papers, etc.
           
Use a soft bristle or flat brush for acrylic, also good for applying medium or glue. A small paint pad also works well. Keep the brush in water when not gluing- (while cutting out and laying out the design.)

Do not presoak tissue papers. Some will disintegrate. Lay the tissue papers on waxed paper or butcher paper if you have it. News papers will work, too.

Apply medium or glue to the background, then to the back of the tissue shape if it is strong enough, and place the shape on the background, either flat or with wrinkles. When fully placed, apply more medium or glue to the front side of the tissue if you choose. The acrylic medium saturates the tissue creating variations of color, where the tissue overlaps colors underneath. If the surface of the tissue is not saturated, it will be more opaque, and the finished piece will require framing under glass.
           
If the image is on heavier paper, such as magazine images, dip the image to be collaged in water, and lay on paper towels briefly. This presoaking keeps it             from curling, and also keeps it from wrinkling as it dries on the background, as it shrinks, pulling the paper taut.
           
Then coat the back of the paper to be applied to the ground, with glue or medium.
Place the paper just as you want it for your composition.

If you have a soft rubber brayer or small roller, this can be used to work any air pockets toward the edges of the paper.
           
If bubbles do form between the ground and the paper, us a needle to make a small hole in the paper, and gently work the air out of the bubble.
           
Acrylic pigments can be used to modify the image colors and values if desired.

Clean the brush with dish detergent. Leave detergent in the brush, shaping it, to keep any acrylic residue from hardening around the bristles.
           
Some papers or fabrics will be more dramatic if not varnished on the top. If so, display under glass. Plan for a mat on top around the composition.
           
Let the finished collage dry overnight. Once dried, add more materials if desired.
           
Coat the collage with two coats of Acrylic medium or varnish. Matte finish avoids a shine on the surface. A collage on primed Masonite panel that has been varnished can be framed without glass. If the image is not varnished, the finished collage should be covered with glass before framing, with a mat to separate the art from the glass.

My Own Project
 
One of my own Collage Ideas was to be worked out on a Canvas panel sized 16x20” in an Egyptian theme. I found Egyptian imagery from an old printmaking project. I had once collected newsprint papers that were used for cleaning my inking rollers, which had transferred the Egyptian imagery to the papers.

Because newsprint is not permanent, I had scanned these papers into my computer, and printed out the images on good Epson paper, to be used now in this collage effort. This is one method I use to have colorfast pigments and good reliable paper. The light weight photo quality image paper is 13 x 19”,  can be saturated with water, and dries on a panel without excessive wrinkling.

One problem with these ink jet images is that the acrylic medium tends to darken them slightly. You may lighten the image before printing, prior to using it for collage.

I found other Egyptian images from an old Life advertisement for a book series, and adhered these to the canvas panel. At some point of development, I scanned the work done up until then. (above)

Although excited to be working hands on, I hurried too much, so some choices were not satisfying.

I also spent several hours moving different image shapes around on the computer, to help me decide what I wanted to do to the collage in the next phase. (See below) I am still not satisfied with the result.

 Now the challenge is to rectify the aspects I want to change and improve.At this point the collage  is too dark, I would like to add more images, and I would like to straighten out some of the lines already established. 


My Past Life, a Long De Nile, Unfinished Computer image. © by Ruth Zachary

Writing and Images are the © of Ruth Zachary.

Sunday, June 22, 2014

OTHER COLLAGE APPROACHES

Red Shoes, 12x16" Approx.   Computer Design.                                        ©by Ruth Zachary


The above design was created on the computer in the same way as a mosaic or tile approach using collage, minus the glue. I show it here so that others might interpret the design approach for their own ideas, if working with collage. People working in many different media will see that a design approach is easily translated from one media to the next.

Example: An artist who used to do etchings, Max Pappart (spelling?) created images that included flat colors, geometric shapes and some with torn edges, that look like collage. If this approach to design appeals to you, you might create collages that are inspired by his work. I am suggesting that you learn from other artist's work, but not that you try to replicate it. The more you create, the more the work you do will develop into your own unique style, as you follow your own preferences.

A background layer of the pinkish red was created.

Layer 1, of brown experimental texture, (smaller than the background) was placed over the background.

Piece by piece, the textured layer was cut apart, moving the sections, and eventually the tiles, outward
toward the margin of the pinkish red layer, leaving the pink to outline the shapes created. When working this way on the computer, it is important to save and close and reopen the document often, so that changes are not lost.

Color variations were created by filling the shoe and skirt shapes with red. Other- leg shapes and other clothing shapes were given a transparent color in a blue color.

A gold layer was created, and arranged to fall behind the background. If the background layer prevents this, make copies of the layers wanted and make the background inactive, or invisible.
Sections were cut through the layers arranged on top to leave the gold showing through.

What I learned:
I could have simply selected shapes to suggest a background behind the figures, and to accent the diamond motif, and filled with the gold color.

I could have painted parts of the collage after establishing the outlined areas.

I might have experimented with Modes for the different layers, but I did not know how to use Modes at that point.

Writing and the Image on this post are the Copyright © of Ruth Zachary.